把你的代码贡献给组织
操作步骤
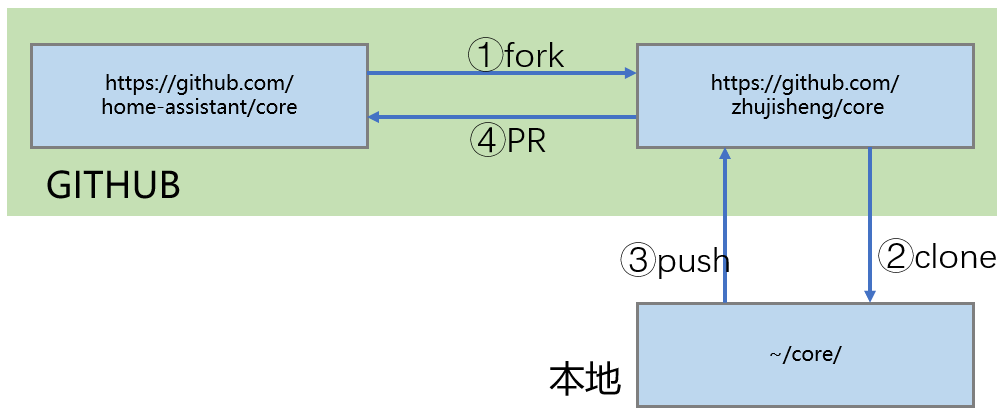
- fork home-assistant项目
- 构建本地开发环境
- 本地库修改与测试
- 提交你的贡献
- 提交网站文档修改
参考
-
git工具的介绍
-
HomeAssistant开发者指导
https://developers.home-assistant.io/docs/en/development_index.html
-
核心过程
-
构建开发环境命令
-
安装基础软件库
sudo apt update sudo apt-get install python3-pip python3-dev python3-venv autoconf libssl-dev libxml2-dev libxslt1-dev libjpeg-dev libffi-dev libudev-dev zlib1g-dev pkg-config libavformat-dev libavcodec-dev libavdevice-dev libavutil-dev libswscale-dev libavresample-dev libavfilter-dev ffmpeg -
创建/进入开发目录
mkdir my_development cd my_development -
克隆远程库
git clone https://github.com/YOUR_GIT_USERNAME/core.git cd core git remote add upstream https://github.com/home-assistant/core.git -
构建python虚拟环境,从源码安装HomeAssistant
script/setup
-
-
修改与本地测试(以增加
image_processing.qrcode为例)-
创建工作分支
git checkout -b qrcode -
修改
# 编辑组件程序 vi homeassistant/components/qrcode/image_processing.py vi ...... # 生成新的requirements_all.txt script/gen_requirements_all.py -
代码规范检查
pip3 install -r requirements_test.txt flake8 homeassistant/components/qrcode/image_processing.py pydocstyle homeassistant/components/qrcode/image_processing.py pylint homeassistant/components/qrcode/image_processing.py -
完整测试
toxtox命令,运行时间非常长
-
确认修改
git add .
git commit -m "Added some-feature" --amend --author="YourName <youremail@xxx.xxx>"
-
-
提交你的贡献
-
获取最新官方版本内容
git fetch upstream dev # 获取官方的当前分支 git rebase upstream/dev # 调基 -
将修改发布到你fork的项目中
git push origin HEAD -
创建Pull Request(在github网站上进行)
本视频中创建的PR链接:https://github.com/home-assistant/core/pull/20215
-